Windows 98 Installation Guide:
You need to make sure that you have the BIOS/Start up, so that the CD-ROM drives boots before the Hard Drive. To do this, you need to enter the BIOS/Start up by pressing: ESC, F1, F2, or DEL. Usually during POST (boot up) there should be something on the bottom stating on how to enter the
BIOS/Startup. Press the button that it says to press or try one of the above until you enter BIOS/Startup Menu. Now using the arrow keys, there should be a tab that says, Startup/Boot Order. Under that should be a list with a list of options, make the 1st Boot - Floppy/3.5 Floppy, 2nd Boot - CDROM, 3rd Boot - Hard Drive, 4th Boot - Other. Place the CD in the CDROM Drive, save and exit the BIOS settings.
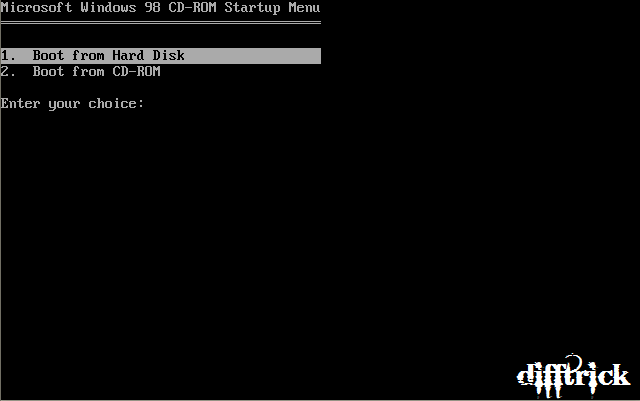
Step 1: After exiting the BIOS the computer will restart. You will get the above screen after the computer finishes POST. Select Boot from CD.

Step 2: After selecting Boot from CD the above screen will come up. Select Start computer without CD-ROM support.

Step 3: When if finishes loading, you will see the above screen with A:\. Type fdisk and then press enter. This is how the screen should look:

Step 4: You will come to the screen above. Press Enter.

Step 5: After that you will come to this screen, press 1 then Enter.

Step 6: You will then come to this screen, press 1 then Enter.

Step 7: Now the program will check the Hard Drive, and then will make the partition. Press Y then Enter.

Step 8: After that is done you will come to this screen, press ESC. You will then come back to the black screen with A:\. Press Ctrl+Alt+Del. This will restart the computer.

Step 9: You will then come back to the Boot Select Screen. Select Boot from CD-ROM.
Step 10: Select Start computer with CD-ROM support. The computer will now have CDROM support; you will come to the black screen with the A:\. Now type D:\WIN98\format C:
This is how the screen will look:
A:\D:\WIN98\format C:
This is how the screen will look:
A:\D:\WIN98\format C:
Step 11: You will be asked if you want to proceed with the format. Press Y, and then Enter. Depending on the size of the Hard Drive, this may take a while. After it is done formatting, press Enter (Do not enter a label).

Step 12: Now it is time to start the install of Windows 98. After pressing Enter, you should be at the A:\. Now type D:\WIN98\setup. This is how the screen should look:
A:\D:\WIN98\setup
Before the install can start the Windows 98 setup need to check the Hard Drive. Press Enter, this also takes long time depending on the size of the Hard Drive.

Step 13: After scandisk has finish, and the files have been copied, you will come to this screen. Click Continue.

Step 14: Select C:\Windows, and then click Next

Step 15: Select Typical, and then click Next.

Step 16: Select Install the most common components, then click Next.

Step 17: This here is optional; change the values for Computer Name, Workgroup.
Computer Name: MyComputer
Workgroup: Home
Step 18: After you have made the changes, click Next.
Computer Name: MyComputer
Workgroup: Home
Step 18: After you have made the changes, click Next.

Step 19: Select your location, click Next.

Step 20: Click Next, you can choose to make a Windows 98 Startup Disk, if so then insert a floppy then click OK, if not the click Cancel.

Step 21: After the Startup Disk is completed, if you choose to make it, click Next to start copying Windows 98 files.

Step 22: After the files have finished copying, remove the Windows 98 Startup Disk, and click OK to restart the computer.

Step 23: You will come to the Boot Select Screen, select Boot from Hard Drive.
Step 24: The next screen you will see will be the Windows 98 Splash Screen.

Step 25: Enter the User Information, and then click Next.

Step 26: Read and agree to the EULA, then click Next.

Step 27: Enter the Windows 98 Product ID/Key, and then click Next.

Step 28: Click Finish.

Step 29: The computer will restart, select Boot from Hard Drive. The Windows 98 Splash Screen will come up. Windows is now finishing the last minute settings.

Step 30: During those last minute settings, you will need to set the clock. Once done, click Apply then Ok.

Step 31: The Windows Install is also most complete, and after it finishes the computer will restart.

Congratulations, you have installed Windows 98.


0 comments:
Post a Comment